Level: Tsavo Highway
Multiplier: 1.5x
Effects: Enemies dodge grenades, needles, and vehicle assaults with a far greater success rate.
Directions:
1. Keep battling through to the point where you must fight a group of Brutes, two of which are using Choppers.
2. Kill all the enemies, destroy the shield, then continue through until you reach a long, winding bridge. At this point a Covenant Battle Cruiser should fly overhead.
3. To your left you will see a series of yellow ladders. Go to the very last one. If you receive a regenerator at the top, you will know it is the correct ladder.
4. Jump over or around the large metal bar on the right, then turn to the left.
5. Look down and you will see a large, black support below you. Jump down onto it.
6. Walk along to the end of the support, then turn to the left again.
7. Now you should be able to see the skull on a cliff across a gap. Jump across the gap on to the cliff, and get the skull.

Catch Skull
Level: The Storm
Multiplier: 1.5x
Effects: All AI-controlled units throw grenades more often, where applicable. The Catch skull has no effect on Flood, as they don't throw grenades. It should be noted that they will throw an unlimited amount of grenades at their enemies. Grunts have been seen throwing more than 4 in a row; Brutes have been seen throwing upwards of 8 in just a short period of time, Elites more than 9 consecutive grenades, and even Marines throwing up to 11 grenades in campaign.
Directions:
1. Battle through to the point where you fight an AA wraith, a handful of Ghosts, and a standard Wraith.
2. Kill all the enemies except the wraiths.
3. Find the building that had a brut and some other enemies in it.
4. Drop behind the building so that the building is between you and the wraiths.
5. You should find a flipped vehicle. Flip it.
6. You should see a silo like building. (See image) On top of this is the skull.
7. Back the vehicle you flipped up to the silo like building and use it to jump up onto the building.
Note: A bubble shield comes in handy when you’re trying to get the skull because it will protect you from the wraith and give you more time to get the skull.
Fog Skull
Level: Floodgate
Multiplier: 1.5x
Effects: Your motion sensor is no longer active.
Directions:
1. At the beginning of the level, you will walk into the destroyed city of Voi. As soon as you enter the city look up and to the right at the top of the building closest to you on the right.
2. Take out a weapon with a scope (preferably a battle rifle).
3. Wait for the sergeant to say "All squads, report!"
4. You will see a single flood combat form run onto the roof of the building. It will jump across the street above you.
5. Now that you know which one it is revert to last save.
6. This time kill the flood just before it jumps.
7. If he dies at the right time the skull will fall off the right-hand building so you can pick it up.
Note: It could take many tries before you kill him at the right time so be patient and if you fail just revert to last save and try again.
Famine Skull
Level: The Ark
Multiplier: 2x
Effects: This skull makes it so every weapon you pick up is half empty. Even weapons you get from killing your friend in co-op.
Directions:
1. At a point in the level, you will be directed into a fork in the road.
2. Go straight into the giant bowl-like valley, and kill brutes till you find a deployable cover.
3. Go back to the fork and take the other road.
4. Kill the two ghosts and continue on till you have to make a turn.
5. You should now be on an incline with some rocks to your right.
6. Climb onto the rocks and climb up onto the large rock.
7. Jump from the large rock onto the road structure that is in front of you.
8. You should see some jutting supports on the road building.
9. Go to the very last one, at the end of the platform.
10. Stand near the support and at the point where the incline stops.
11. Now throw down your deployable cover so that it is almost touching the support.
12. Jump on the cover and use it to jump onto the gap in the support.
13. Follow the support to the end and pick up the skull.
Note: There are many ways to get this skull such as grenade jumping, using a brute chopper, or using a brute shot.
Thunderstorm Skull
Level: The Covenant
Multiplier: 1.5x
Effects: All enemies are promoted to the highest available rank. The number of shielded Flood elite combat forms is also increased.
Directions:
1. After taking down the first tower there is a part in the level where there are two hornets and you are expected to take one and get to the third tower to take it down.
2. The screen will briefly show "If you want it done right" as you hop into the Hornet. If it does not say "If you want it done right", then no skull will be present.
3. After you get in, start to fly to the third tower. On your way there, you will see the second tower (which was disabled by the Elites).
4. This is also the tower with the Terminal.
5. Fly over to it.
6. You will hear an Elite reminding you that the tower is already disabled. This will confirm you are in the right area.
7. There is a long flat part of the tower that extends out over the ocean (semi-enclosed).
8. There is a very tall ramp that leads up to it. At the end of the extension you will find the Thunderstorm skull.
9. You must get out of your Hornet or Banshee, or the skull will not appear.
Tilt Skull
Level: Cortana
Multiplier: 2x
Effects: All enemy weaknesses and resistances double. Example: Brute armor is weaker to plasma weapons and stronger against projectile weapons.
Directions:
1. The skull is at the top of the large circular room where Cortana is screaming for help.
2. When you enter this room you will fall out of a hole in the ceiling, next to a sitting, dead Elite.
3. To the left of the room will be some small, somewhat fungal, growths on the walls. Near this is a rounded pillar.
4. Stand on the pillar and jump to the thin growth outcrops to the left.
5. On many of them you will hit your head on an obstruction above if you are not careful - spoiling the jump; try backing up slightly first.
6. After the first two to the left, turn around and look away from the rock wall - then left ninety degrees for another one with a longish extrusion of Flood material.
7. This one is difficult as your head will hit the wall with jumps from many of the obvious positions.
8. One jump that works is at the tip of this jump, back about 2 feet from the edge, and jumping slightly left (approx one foot) of the tip of the target jump.
9. Another jump that works is; When you get on the the upper outcrop on the left, facing the other outcrop you are jumping to, move as far as you can to the left.
10. Then, jump toward the other outcrop with the extension of flood material.
11. Walk up the extruded Flood tentacle onto the roof of the area where you will find the Skull in a pile of blood and bones.
Note: Note that underneath the platform you usually walk on are a two to three deployable covers. These can be placed on the pillar and the ledge to make the jumps easier and help you avoid things that can cause your jumps to fail. You can also jump on the weapon container. You will then jump to a smaller platform covered in Flood biomass, and then onto what appears to be a Flood tentacle. Finally, you will jump to the purple platform. You should see a human skeleton. The skull is what you're looking for.
Mythic Skull
Level: Halo
Multiplier: 2x
Effects: All of the Covenant you encounter have twice the amount of health.
Directions:
1. At the beginning of the level move forward, hugging the right wall and curving slowly left in the cave up ahead.
2. Enter the cave and turn around.
3. Continue going through the cave going backwards till you see the cave branch off.
4. You should now be looking at two paths. One leading back to way you came and a different one leading to the skull.
5. Turn on your flashlight and go down the second path.
6. Follow the second path to the end and there you should find the mythic skull on the ground among some rocks.
Note: Seems to have a similar effect on the player. Immensely increased unshielded durability in Sierra 117 as well as Marines and the Arbiter observed with this skull active. However, this does not mean that the player should leap into the fray, as even with this increased durability the player will be killed quickly.
Silver Skulls
Blind Skull
Level: Sierra 117
Effects: this skull removes your crosshairs and makes you literally shoot blind. You won’t see your weapons, shield, radar; etc.
Directions:
1. In the beginning of the level, you and your troops will come across a waterfall with a Phantom dropping off troops. This is your first contact with any enemies.
2. Kill all of the enemy troops to get them out of the way.
3. Face the water body (lake) and move to the right of the area towards the lake.
4. There is a rock jutting out of the land, and one of the larger rocks extends out over the water.
5. To the right of these rocks there is an old human bunker.
6. The blind skull is at the tip of the rock.
Grunt Birthday Party Skull
Level: Crow’s Nest
Effects: if a Grunt is shot in the head with any headshot-capable weapon (such as the Battle Rifle, Beam Rifle, Carbine and Sniper Rifle) or a Magnum, confetti explodes out of it, and a sound clip of children cheering from the game Viva Pińata can be heard in the background. When the Grunt's head explodes, their mask will usually fall off.
Directions:
1. On your way to the barracks (after you view the bomb, and after the flying Drones), you will come across a part in the level where you drop down a hole with fallen rocks at the end.
2. Cortana sends you a message ("you'll be called upon to serve") when you land.
3. Once the message is over, you will find yourself in a wide corridor with open pipes on either side, with Drones flying across every now and then.
4. If you walk to the end of the corridor, there is another large drop (purple pipe with a rotating fan), but DON'T GO DOWN.
5. If you go to the very edge and look down the drop, you will notice a small ledge protruding out a little bit with a green arrow just visible in the middle of it.
6. Go to the very edge of the pipe and slowly walk backwards.
7. You should now be on the edge of the ledge that you saw earlier.
8. Go into the room that you see and pick up the skull you see.
Note: If you are playing with any of the skulls active you should have this skull active. It does not increase the difficulty of the game, it actually makes it easier. When you blow a grunt's head off the explosion slightly damages nearby enemies. Groups of three or more grunts, if you kill them quickly, within 3 seconds or so with headshots, will most likely kill any single additional grunt in the nearby vicinity. You can also set off large chain reactions if you activate Cowbell and Catch in conjunction. First kill Grunts by shooting them in their chests to make them drop their plasma grenades. Do this repetitively until the plasma grenades build up. Next shoot one in the head to blow up their head. This will set off all the built up grenades. Sit back. Watch. Enjoy.
Cowbell Skull
Level: The Ark
Effects: The force of explosions is increased immensely.
Directions:
1. You must start this level from the beginning - starting from any other point will fail.
2. After defeating the Scarab, grab a gravity lift from the small structure in the center.
3. Then continue on until you pass the room with a lot of explosive plasma containers.
4. In the hallway after this room, there is a tall section with openings above the turning point of the hall. (The skull is in the top one of the highest of these.)
5. Use the gravity lift to get there.
6. The ideal place to deploy it is about 3/4's down-ramp and a little to the left of the middle.
7. You should be running down-ramp and jump so your jump-apex is above the gravity lift. You should also be running towards the tall section, aiming towards the middle of the top shelf on the section.
8. If your gravity lift is destroyed, you can always revert to last save since the room containing the skull is a checkpoint.
9. Also if you have difficulty getting there crouch while being grav-lifted.
10. If you don't get the skull at first then keep trying, you will get it eventually.
Note: It is suggested to always couple this skull with the Grunt Birthday Party skull for maximum damage when encountering large numbers of Grunts. Another possible use for this skull would be to couple this skull with Catch (so that grenade explosions are deadlier and occur far more frequently), creating a greater sense of danger in large firefights. While this makes life more dangerous for you it also makes it a bit easier. Your grenades will obviously be more destructive, but also the force of the explosions from the grunts heads exploding (with the Grunt Birthday Party skull active) will increase as well. This skull unfortunately weakens your melee attacks.
IWHBYD Skull
Level: The Covenant
Effects: Unlocks new, often humorous, dialogs for the AI. Such as "THIS IS SPARTA!" or "Who wants ice cream!?" for some marines or "Pie is good" said by some Brutes. Sometimes a Brute may even say "He was my lover!" when you kill a nearby Covenant soldier, and Grunts may say "Stay close to me, Nipple-mate!" to another Grunt when they are suspicious that enemies may be nearby, or "Thank you for choosing Air Blue-Ball" as they go Kamikaze, Elites sometimes make humorous remarks when you exchange weapons or stare at them for long periods of time. Remarks like "I shall name my next child after you" or "I, I, I think you're sexy, too." Another comment from a marine is "So you're gonna take my girlfriend, too?" if you exchange weapons with him.
Directions:
1. In order to get the IWHBYD skull you must start the mission from the beginning of the level and play until you reach the final battle scene, where the Prophet of Truth is planning on lighting all seven rings.
2. Once you reach the bridge, battle your way across with the Arbiter and the Flood.
3. Kill all Covenant.
4. Watch/skip the cinematic, and kill all the Flood (this is optional, but makes the procedure much easier).
5. Once the bridge is devoid of enemies, you will have to literally jump through the 7 rings in a complex order.
6. Once you have completed this, the IWHBYD skull will appear at the beginning of the light bridge leading to Truth's podium.
Original Sequence order: 1, 3, 4, 6, 7, 5, 4, 6, 5, 4, 5, 3, 4
Shorter sequence order: 4, 6, 5, 4, 5, 3, 4
Note: Each number corresponds to the ring you must jump through. The ring at the elevator is 1. The ring next to Truth is 7. The ring with red on it is 4. Be sure to actually jump through the rings, not just go through them. This skull does not affect the difficulty of the game. It just makes the game a bit more fun. If you are doing this level on co-op, only one player can do the sequence. If the other player jumps through a ring while you are in the middle of the sequence, even if it is the next ring, it will mess up and the skull will not appear.
Other Skulls
Unknown Skull
Level: Cortana
Directions:
1. The Unknown skull can be found in the Fusion Core room.
2. First, kill all of the Flood present.
3. Once the room is free of Flood, search the room for some stacked up deployable covers.
4. Make sure you have some grenades (not spike grenades or firebombs) with you.
5. Grab one of the deployable covers and climb one of the pillars that extend from the upper floor.
6. Deploy the cover and climb it.
7. Then, jump to the upper floor.
8. If you can't do it with the deployable cover, throw a grenade on the end of the pillar and grenade jump.
9. It's very difficult to grenade jump but it is possible.
10. If you got the Famine Skull by grenade jumping, you should be able to reach the upper floor in 2-3 tries.
11. When you're up, search around the surface and look down. At some point, you should find the Unknown Skull among some bones.
12. It's above the main door.
Terminal Locations
Terminals 1-3
Terminals 1-3 are found in the level The Ark
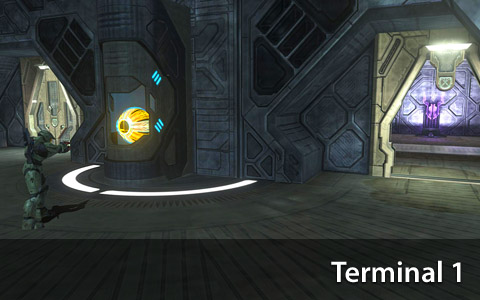
Terminal #1 is found in the first building you go into. You battle your way past the two hunters and go up the hill. You drop down and there is a building you have to go into. Once inside you will find a door to your left. Go through the door and you will find a terminal you have to access.
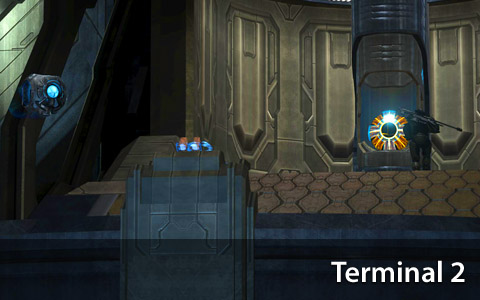
the second terminal is located at the part of the level sere you have to activate the bridge to let the tanks across. The terminal is located almost directly behind from the bridge controls.

pay close attention because this terminal is very easy to miss. After you defeat the scarab you will head into a large structure. There will be a room with several sleeping grunts and a brute doing something in the corner. Kill the brute and the grunts and go through the door near the brute. Go on till you find a single grunt walking toward a door. Once you find this grunt you need to drop down and there will be a door under the ramp you were on. The terminal is through that door.
Terminals 4-6
Terminals 4-6 are found in the level The Covenant
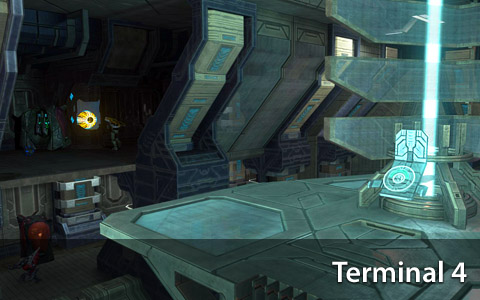
the fourth terminal is found in the first shield generator tower you go into. When you access the first Elevator leading to the tower controls, jump from the elevator platform to the platform on the opposite side from where you accessed the elevator from. The terminal is dead ahead.
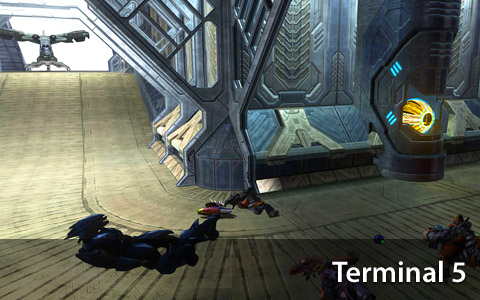
the fifth terminal is located at the second shield generator tower. After getting a Hornet vehicle, fly towards tower 2 (the one that the Arbiter has already disabled). A voice will remind you that Tower 2 is already clear, just to confirm you are at the right place. The Terminal is just inside of the structure.
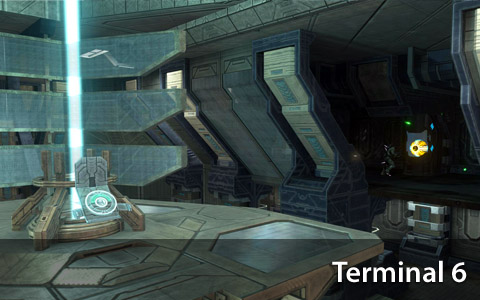
the sixth terminal is just like the fourth one except in the third tower. Jump to the platform just like you did for the fourth one and there is the terminal.
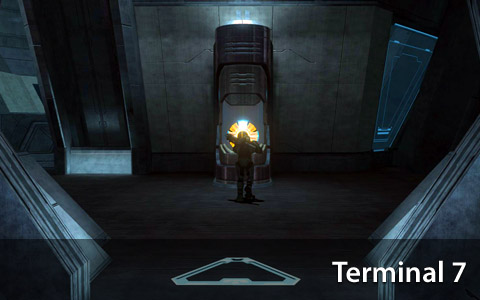
Terminal 7
the last terminal is located in the level Halo

the last terminal is located in the beginning of the last level. To find it, simply head forward from the start of the level, until you encounter the area with a few structural beams going from one wall into another. At this point, turn right, and look for beam separate from the rest (as shown above). Follow this beam into a doorway. Cortana will ask you, “Where are you going?”. Turn left once inside, and the Terminal should be in view.